
|
 News
News
Flashing for Adhered Masonry Veneer
|
Subscribe to FREE newsletter
| Jan 14, 2018 |
Adhered masonry veneers are a popular cladding choice today as adhered masonry materials have improved significantly during the last few years. The texture of cultured stone is more durable and realistic, offering a better solution for new and updated veneers. Many masons are installing this type of wall as a separate business unit for their companies. The adhered market is filled with products that can enhance the look of any project. Wall products that enhance the performance of the walls are hidden, so they will never be seen by most people. But we know how important they are.
Following is a breakdown of the available products for flashing adhered masonry veneer.
Weather Resistant Barrier (WRB), or the barrier attached directly to the exterior sheathing of the structure: Several forms of barriers are available, including fluid or membrane applied, paper sheet goods in the form of Grade D or building felt, and polymer-based house wraps. The main purpose of the WRB is to protect the substrate from the passage of liquid water. Each form of WRB has its own features, and choosing the correct product for your project depends on the geographical location, type of construction and placement of insulation within your project.
Drainage plane: The drainage plane is basically a three-dimensional mesh or rainscreen plane placed between the scratch coat and the exterior WRB layer, used to increase the drying function of the adhered masonry system. This layer is important because it can allow air and water to move on the backside of the scratch coat. A major benefit of a three-dimensional drainage mat is that it will not increase the labor on the project. The same tools used for installing WRB can be used to install a drainage mat.
The benefit occurs when the lath and the drainage mat are mechanically attached to each other at the factory. A labor step in the installation is omitted, saving the installer labor dollars. This step of adding the drainage plane allows the installer to omit the second layer of WRB. The drainage plane, placed on the outside of the substrate WRB layer and inside of the scratch coat, allows air and moisture to move behind the scratch coat to the weep screed at the bottom of the wall through a 90 percent open-weave system. Adhered veneer masonry systems all become saturated from time to time, but a drainage plane allows the system to dry more completely from the inside and outside more rapidly, reducing the possibility of direct water passage to the substrate as well as waterrelated damage to the veneer.
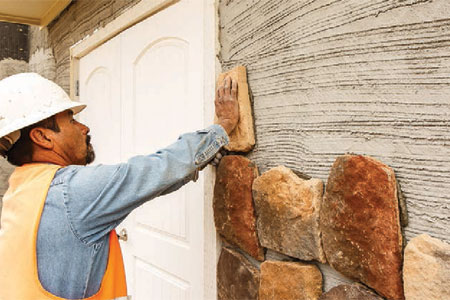
Shown is a thin natural stone veneer unit being installed.
Taping WRB joints: Taping the WRB or the rigid insulation is a quick and inexpensive step that can reduce unnecessary water intrusion problems. The moisture that can form on the exterior side of the WRB or insulation will quickly run down the wall. When it is specified, the joints must be taped. Even when it is not specified, it is still a must to tape the joints.
Rigid insulation: Rigid insulation is now becoming much easier to apply under an adhered masonry veneer. With pre-engineered attachment screws and washers, it has become an off-the shelf sale for the installer. Once the insulation is secured, the wire and the insulation should be attached at 6-inch vertical intervals and horizontally on every stud. It is never recommended to install attachment anchors between studs. Anchors that are not secured into a structural element can “back out” over time, resulting in areas where stone loses adhesion to the scratch coat.
Extruded wire: Extruded wire is fastened to the substrate and creates the support and structure for the base of the adhered masonry veneer or scratch coat. The wire mesh can have the drainage plane factory-attached, or it can be installed by itself. Wearing gloves is always a best practice when installing lath. I prefer using a small angle grinder with a carborundum blade to make all my cuts. I set up two saw horses and place a sheet of plywood on the horses. Using an old 2- x 4-inch stud, I can use it to mark the cut and to elevate the wire lath to keep my blade out of the plywood. I have found this single step can increase production of my lathing operation and can easily be used on a scaffold when necessary.
Scratch coat: The scratch coat is the foundation for the adhered masonry veneer and must encapsulate the wire mesh completely. When installed on top of a drainage plane, water that penetrates the scratch coat drains through the drainage plane to the weep screed. The scratch coat is always “scratched” with a plasterer’s scarifier, which increases the surface area for a stronger mortar bond.
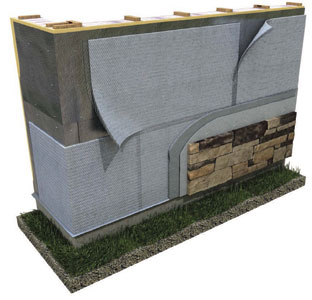
Drainage mesh and metal lath in one saves time and labor.
Top coat: The top coat of mortar is the mortar that attaches the veneer material to the scratch coat. The mortar must fully cover the back side of each veneer unit. Edge spreading of mortar will create pockets that can collect moisture and will pop the units from the scratch coat after several thermal cycles.
Veneer material: Veneer materials are available in a wider range of materials, styles and colors than ever before. You can choose cultured stone, sawn thin stone veneer and thin brick veneer. It will be tougher to choose from all the choices of veneers than it will be to install them. When purchasing or selecting the veneer you plan to install, it is always a good idea to verify with the manufacturer or distributor that the product is less than 15 pounds per square foot, installed. This is standard bond strength for many mortars used to place veneer units. Heavier veneers will need to verify the stud material and sizing, and can be installed using mortars specifically designed for the application.
Adhered masonry veneers are becoming as popular as cavity wall veneers in many parts of the country. Installing them will take the skills that you, as a mason, lalready possess. It also will create beautiful and long-lasting veneers for your clients. Understanding each component will help you provide a well-functioning wall system that will keep clients satisfied. You can be proud of your work for years to come.
Steven Fechino is an engineering and construction manager with 35 years of experience in masonry restoration, moisture management and hardscape construction. He can be reached at [email protected].
For other relevant searches, you might want to try: